Pages

Showing posts with label Pinterest. Show all posts

Monday, September 2, 2024

Hot Diggity Dog


For your Labor Day eating pleasure.....


I was browsing Pinterest the other day and came up some "hot dog" recipes and thought...who needs a recipe for a hot dog?

I realized that most of them were more for different marinades, grilling and cooking methods and such.  One caught my eye and I decided to give it a try.

I have now discovered a new and favorite way to cook hot dogs!

FYI: For this "experiment", I used Nathan's Skinless hot dogs, because (a) they are delicious and (b) they were on sale for Labor Day weekend!

So, you will need

Hot Dogs
Water
Butter
Buns
Favorite Hot Dog Toppings

1) Place your hotdogs in a pan and fill with water until the water is 1/2 way up the hotdog.


2) Simmer hotdogs until all the water evaporates. Move the pan around a few times to roll the dogs so they cook evenly. You should see small boil bubbles around the hotdogs.


3) Once the water is about gone, drain off any remaining water and then add a little butter to the pan. Roll dogs around in the butter to coat.


4) Cook until the desired doneness.


5) Put in buns (best if you have steamed the buns ahead of time) and then top with your favorite toppings (PS: Don't fuss at me that ketchup doesn't belong on a hot dog because in my opinion no hot dog is complete without ketchup)


Monday, November 6, 2023

Millionaire Bars


I saved this recipe onto Pinterest, I don't even know how long ago.  I have wanted to make it for a long time (probably years).  Well...now that I am retired, I have a bit of time to bake now. Bake, without rushing, that is.  It is nice just to spend a quiet, relaxing Monday baking and trying a new (to me) recipe.

I don't exactly know why these are called Millionaire Bars, but my guess is because they are so RICH!! Boy, are they rich...but so, so good.  This is a keeper. 

There are a few steps involved, but all and all, it is a pretty easy recipe. I give it 10 out of 10 stars.  I hope you enjoy them.

Millionaire’s Bars

Makes about 3 dozen bars, adapted from Eats Well With Others

Ingredients
For the shortbread:

  • 2 cups all purpose flour
  • 2 tsp baking powder
  • 1/4 tsp salt
  • 1 cup unsalted butter, room temperature
  • 1/2 cup sugar

For the caramel:

  • 1 cup unsalted butter, cut into pieces
  • 1 cup sugar
  • 4 tbsp light corn syrup
  • 2 (14 oz) cans sweetened condensed milk

For the chocolate:

  • 8 oz semisweet chocolate, finely chopped
  • 1 tsp light corn syrup
  • 1/2 cup unsalted butter, cut into pieces
  • fleur de sel or sea salt for sprinkling

Instructions

  1. To make the shortbread, preheat the oven to 325.  Line a 9×13-inch baking pan with parchment paper.  In a small bowl, combine the flour, baking powder and salt.  In the bowl of a stand mixer fitted with the paddle attachment, cream together the butter and sugar until light and fluffy, about 2 minutes.  With the mixer on low speed, blend in the flour mix until just incorporated.  Transfer the dough to the prepared baking pan and press into an even layer.  Bake for 15-18 minutes or until golden.  Transfer the pan to a wire rack to cool completely.

  2. For the caramel, combine the butter, sugar, corn syrup and sweetened condensed milk in a medium saucepan over medium heat.  Heat, stirring occasionally, until the butter is melted.  Increase the heat to medium-high and bring to a boil.  Reduce the heat to a simmer, stirring constantly.  Continue simmering and stirring until the mix turns an amber color and thickens a bit.  Pour over the shortbread layer as evenly as possible and allow to cool completely and set by chilling in the fridge for a few hours or overnight.

  3. For the chocolate layer, in a double boiler, combine the chocolate, corn syrup, and butter over simmering water.  Heat, stirring occasionally, until the chocolate is fully melted, and the mixture is smooth, pour evenly over the caramel layer and use an offset spatula to smooth it out.  Allow to cool for a minute or two and then sprinkle on the fleur de sel.  Chill, covered, until ready to slice or serve.

Friday, December 4, 2020

Instant Pot Chicken Chili


The weather turned a little cooler this week so I decided to make an Instant Pot chili recipe. I decided to try something a little different - a Chicken Chili recipe so off I went to Pinterest and luckily I found a recipe from "Pink When".

I made a few tiny modifications (very tiny).  I follow a recipe as written the first time I make it and then tweak it the next time until I get it exactly to my taste.


Instant Pot Chicken Chili
Click Here for Printable version from PinkWhen

  • 1 tbsp olive oil
  • 2 medium chicken breasts boneless, skinless
  • 14.5 oz. chicken broth
  • 15 oz cannellini beans, rinsed
  • 15 oz diced tomatoes with juice (I used regular but will use Rotel from now on)
  • 15 oz black beans, rinsed
  • 1 package ranch dressing mix
  • 8 oz cream cheese, cubed
  • 8 pieces bacon cooked & crumbled (I will omit this from now on)
  • 2 cups cheddar cheese shredded 
  •  

        
    Using the saute function on Instant Pot, add olive oil, then chicken breasts and cook for 2 minutes on each side to lightly brown the chicken  Drain & rinse the black beans and canellini beans


     Add ranch seasoning, chicken broth, tomatoes, black beans, and then top with cubed cream cheese. Do not stir.  Secure lid into place, making sure the vent is set to seal. Manual cook for 5 minutes. Allow to natural release for 5 minutes and then carefully manually release until all steam has been released.


    Remove the chicken breasts and shred, using 2 forks.  Return the shredded chicken to the Instant Pot and stir the contents well. 

     Add the crumbled bacon and cheddar cheese and stir until combined.  Serve. 

      The next time I make this, I will add Rotel Tomatoes and omit the bacon.  In my opinion, the bacon doesn't really add much to it and I think adding the Rotel Tomatoes will give it a little bit more of a kick (which I like). 

Tuesday, July 4, 2017

Happy Independence Day!!


I have seen these floating around on Pinterest.  I have wanted to try them before because they are festive and they look pretty yummy.

Our church was having a picnic this past Sunday - a Family Reunion of sorts!  I was to bring a dessert but I wanted something somewhat healthy and my sister suggested these and I thought that was a perfect idea!

Very simple to make - 3 ingredients


1 package of Vanilla (white chocolate) melting chocolate - I used CandiQuik because it comes with a little tray that makes it easier to melt in the microwave.

2 dozen strawberries (washed)

1 bottle of blue sugar (I used Wilton's, which I got from Michael's Arts & Crafts)

Wash and dry the strawberries


Melt the white chocolate for 60 seconds and stir (don't overheat or you will ruin the chocolate)
Dip a strawberry into the white chocolate (shake off excess)


Then sprinkle the tip with blue sugar (hold it over a bowl or plate so when you are done, you can put the extra sugar back into the bottle).

Place them on parchment paper to let them dry.


Once they are dry, you can put them in cute little paper cups (also purchased at Michael's) but you don't have to do that - I just thought it made them more festive...


They were a hit!  Very pretty and tasty.  I even made another batch and took them to work on July 3rd

 
The whole process took less than an hour - totally worth it!  Have a safe and happy July 4th!


Monday, December 30, 2013

Saving Money in 2014 - Pinterest Related

I saw this on Pinterest - a way to save $1,378 in one year that won't be too difficult to do....that is IF you stick with it. I started out doing this last year and somewhere along the way kind of forgot about it and stopped saving...So I am starting over this year. I made my own schedule because the one on Pinterest doesn't have dates and I think it helps me to keep track of it better if I have a date to go along with the week.

The dates below are every Monday in 2014 (I started on 12/30/13 since it was the closest Monday to Jan 1st).

The idea is, week one, you save $ 1.  Everyone can do that, right?  Week 2, you save $ 2 so by the end of week 2, you have $ 3.  So on and so forth.

By the time you get to week 52, you still only have to add $52 - that can be a lot to some people for one week, I suppose but that is the MOST you will have to put away at any given time.  If you do this throughout the year, you will have saved $1,378 by the end of the year.  Not too shabby.

I'm going to give it another go this year.  Wish me luck.


Tuesday, November 26, 2013

Bloggy Changes ???


I can't believe I have had this blog for almost 6 years !  Wow!

I've always kept my blog somewhat light-hearted and mostly posted recipes, crochet and knit things, funny photos and some videos but I've been thinking more about what direction I want to go in as the new year is starting to creep upon me.

I've pretty much kept it kind of non-personal but I'm thinking of changing it up a little bit.  I am not going to come here and share my deepest, darkest secrets (not that I really have any) but I may write a little bit more about the on-goings in my life (which will still include some recipes and knitting/crochet stuff). 

While I have had almost three-quarters of a million viewers, the majority seem to come from Pinterest in search of this Chili Dog Casserole recipe, which is great!  But I just don't get the feeling I get a lot of readers, which is okay too.

I started thinking about who this blog is for - it is for me.  I don't have ads, I'm not here to try to make money or get endorsements, as many bloggers do (nothing wrong with that but that isn't why I started a blog).

I mainly started because of Ravelry.  As a way to document my crochet/knit projects. Lately it seems like all I do is post Funny Friday's - which I do enjoy but there is a lot more to me than that.

So... we shall see - I am just exploring and deciding what I want to do.  Only time will tell.

Monday, September 16, 2013

Pinterest Followers

I haven't been on Pinterest too much lately but decided to go in today and take a look around.

My followers have increased - I have over 6,800 followers now!!!!


Thursday, December 13, 2012

Christmas Wreath


One day while on Facebook, I saw a post by Drew Emborsky, also known as The Crochet Dude.
He posted a link to a beautiful wreath on MemeRose.  I just fell in love with it.  I pinned it to my crochet board on Pinterest because I knew I wanted to make it (I want to make everything I pin, but let's face it - I would need several lifetimes to do that-LOL!!)

So...I sat on it a few weeks, trying to decide what colors to make and then a little light bulb went off over my head. Ding...Ding...Ding....(actually that is a bell - haha, I don't think light bulbs go "ding, ding, ding")

I can make it Christmas colors and make a Christmas wreath - hello !!!

So...even though I was getting ready to head out of town and knew I wouldn't have time to work on it...I went to Michael's in search of some Vanna's Choice and I actually had the colors I wanted picked out except for one, I just couldn't find the right shade.  So I thought...let me check the Impeccable Yarn to see if they have it..well, it was a little cheaper since it was on sale, and the shades were almost identical so I ended up getting 5 skeins.

Soft Rose, Claret, Fern, Forest and White (I got the bigger sized skein in white but the smaller one would have been plenty - I had a ton of left over yarn, but I will use them for something else...(a tree skirt comes to mind)

So while at Michael's I wanted to get a 12 inch styrofoam wreath, but they only had it in green and I didn't want the green to peek through so I just got the bigger 16 inch in white.

I was out of town, A LOT and very busy at work so still didn't get to start on it.  Plus I wanted to finish my baby cardigan first.

I took the yarn with me when I went to visit my mom for Thanksgiving and also purchase a new hook from the Crochet Dude's line (I figured since he first inspired me to make this, then the least I could do was to try out one of his hooks).  Let me just tell you that I LOVE this hook - it is so comfortable. 


 See how it has the rubberized (and soft) handle.  I loved it so much that even though I have a complete set of Boye hooks, which I love, I immediately added a whole collection of these to my Amazon Wish List.

Although the photo above is an H hook, I actually used a G hook.  Over Thanksgiving I determined that I think I need 24 squares. I used THIS GRANNY SQUARE Pattern. I only did the first 3 rounds though.  I made 18 of the squares while visiting but then had to return home and as usual, got wrapped up in work but I finally finished the other 6 squares this week.  I'm very happy with the squares...very pretty.


So I started sewing the squares together (not my favorite part, I must admit)


Then I sewed the squared together around the wreath form and TA - DA !!!  Christmas Wreath !!!
I'm very happy with it.


Saturday, August 4, 2012

Pinterest - Dumb Stuff # 1

I see (what I consider to be) a lot of really dumb stuff on Pinterest - now I see a lot of great stuff there but there are things that I just think that if people really stop and think about it for a moment, they would realize how really dumb the idea they are pinning truly is.

Take this for instance....

The pin says "Place a layer of wax paper on top of upper kitchen cabinets where dust and grease particles gather. Every few months, switch out the paper for a fresh sheet. What a smart and simple idea!"

Now . . .   I don't know about you but if  you are only getting up on top of your cabinets about 4 times a year, then do you really need to go through all the trouble and expense of buying wax paper, tearing it off the exact size as your cabinet tops, laying it all up there and then a few months later, coming back, removing them all, throwing them away (wasteful) and then repeat the cutting the sheets the exact size, and relining the tops of the cabinets.  This process would take much longer then just getting up there and wiping it down with a damp dishrag and then washing the dishrag with the regular laundry.

Wiping the cabinets down...free..takes about 5 minutes.  Buying wax paper, making them the exact size of the cabinet tops, throwing them about, repeating the process over and over....cost some money (not a lot but still) and is so wasteful, not to mention time consuming - probably would take a good 30 minutes or more to do all that.

Just grab a damp dishrag, people and dust the cabinets off. Geez !!

Monday, March 19, 2012

Very Pinteresting...

I've mentioned Pinterest before and enjoying seeing 99.9% of things that other people pin.  However about .1% of the time, I will come across something and just kind of scratch my head.  Sometimes it is the comment, sometimes it what they actually pinned.

Take this for example
"Use fitted sheets to cover box springs" - while yes, it looks nice, I'm thinking to myself, what is the point of doing that?  First of all - who sees your box springs except for you and your overnight guest and do they really care that your box spring is exposed for the few minutes they turn down the sheets and get into bed?  When you make your bed up, you don't see the box springs anyway, so why cover them with a sheet?  To me it is just one more item that has to be washed.  Why add to my household workload?

Here is another one:
Turn your toaster on its side and make grilled cheese.  Several problems with this one.  First of all, it won't be a grilled cheese, it will be toasted cheese (which taste different to me than grilled cheese).  Secondly, can't you just use your oven or toaster oven (I know not everyone has a toaster oven but IF you did).  Third, this is a fire hazard - the sides of a toaster can get pretty hot, I don't think laying it down on a wood counter top, where it could scorch your counter top is a very good idea.  May not cause a fire but would leave burn marks on your counter, why would you do that?  It isn't like it is that hard to make a grilled cheese the traditional way on the stove top and it actually would probably be just as fast or faster than using this method.

Do you want to look like you live in a million dollar home, what do million dollar homes have?  Chandeliers of course.  They are expensive though, so you can make your own...

Seriously ?? You are going to make a light fixture from plastic spoons?  First of all, no matter what you do, it is going to look like it is made from plastic spoons.  Secondly, if it gets too hot from the light bulb, the spoons will probably melt (depending on the quality of your spoons I suppose).  Also, can you see how much fun it would be to try and dust that thing, which would probably need dusting about 3 times a week?

Speaking of plastic spoons, how about a nice mirror for you?

I guess this is nicer since the spoons are painted hot pink and the vase of flowers kinds of makes the scene pretty..but like I said, no matter what you do, they still look like plastic spoons.

Now I don't mend to offend anyone that may have pinned these items.  That is fine - I'm sure I have pinned some things that make people go - what????  And like I said this is only about 0.1% of the odd stuff (in my opionion) that I see on Pinterest.  What is so funny about them too is often they have the caption underneath that says "Brilliant" !  Really? You think using a fitted sheet on a box spring is brilliant?  Einstein was brilliant, box spring sheets are not.

Sunday, February 12, 2012

600 Followers on Pinterest !

I know that having 600 followers on Pinterest is not a big deal to some (who may have thousands, but I think it is pretty awesome myself !!


Tuesday, November 22, 2011

I've Been Pinned !!


I know this may seem so silly to some but to me I feel like a mini-celebrity (haha!).  But once of my posts has been pinned on Pinterest !  It is the post for my Chili Dog Casserole.

I only discovered it when I was looking at Pinterest the other day and thought - hey, that looks like the photo on my blog and sure enough - it was !! Then I realized on the Live Traffic Feed that I have been getting a lot of hits for that post.  I'm glad - that recipe is really good and super simple and quick - kids like it too (but usually have to make it without the beans for the kids).  I think it would be good with a bit of jalepenos added for the adults more into the spicer stuff.

I wish there was a way to tell how many times it was pinned/re-pinned but I don't know how.  I've noticed I've gotten a few hits lately too for my Pumpkin Gooey Butter Cupcakes, but that could be because it is close to Thanksgiving and people are probably googling "pumpkin" recipes.  However, I did find one pinner, who had it on her cake board and she also had pinned my thin layer cake !  How cool !

I've been out of commission this month - my dad has been in the hospital and it was pretty serious so I've been out of town for about 3 weeks.  But, thanks be to God, he is doing much better !

Saturday, April 9, 2011

Pinterest

Pinterest? What is Pinterest, you say? Pinterest is, in its simplest definition, a place to catalog the things you like/love.

Basically, it is kind of like bookmarking the websites you like but in a visual way.

You create your own "boards" - for instance, a board for recipes you want to try, a board for free knitting patterns you like (or perhaps want to make one day), a board for your favorite childhood toys, etc.

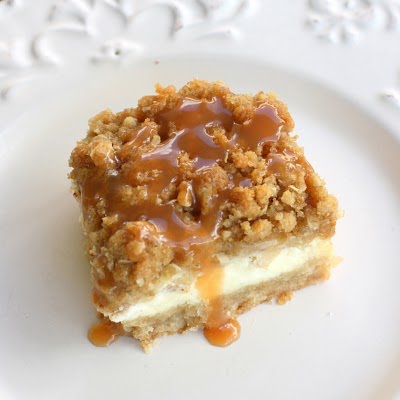
For instance, say you want to make this delicious these Caramel Apple Cheesecake Bars to take to a family reunion 3 months from now. Instead of bookmarking the recipe only to try to find it later among all your other bookmarks, you can "pin" it. Instead of printing it and wasting ink and paper only to try to remember where you put it after you printed it, you can "pin it".

When you pin it, the picture shows up on the board you selected, like this:


Then when you want to make it, you just click on the picture...you are taken directly to the website so you can see the recipe and make this delicious dessert. Very easy and since it is so visual - it is easy to see everything you like at a glance.  You can also see what your
friends are "pinning" - the web pages they like - you can get some good ideas from other's good ideas

Try it now... Here is a PIN of this recipe (click here) - then when you see the pin, click on the picture, see how it takes you directly to the website and the recipe?  Pretty cool, huh? And...much easier to locate than searching through a bunch of bookmarks trying to remember what the name of that recipe was.

Right now the site is still in beta mode so you can request to be added (then you have to wait a bit for them to add you) or you can have a friend invite you and be added right away.  If you would like an invite, leave a comment (with your e-mail address) and I will send you one.

If you like to follow my Pinterest Boards just click HERE