Pages

Monday, February 28, 2022

World Peace Cookies


I remember hearing about these "World Peace Cookies" many years ago, but I have never made them.  To be honest, I am not all that crazy about chocolate...yes, I know, I am unusual.  I mean I like a nice Lindt truffle once in a while but I don't usually eat much chocolate, especially in baked good.  But I had a sweet tooth a few nights ago and had all the ingredients on hand and it sounded fairly simple, so I decided...we all need some peace in the World right now so these cookies might be a good thing.

The cookie has a long history, starting sometime before the turn of the millennium, when Chef  Pierre Hermé, created it for a now closed Parisian restaurant called Korova (which was new at the time he created this cookie).

The cookie because well known or shall I say world-wide famous, when culinary guru, Dorie Greenspan renamed them World Peace Cookies and published it in her cookbook.  The story is that her New York neighbor took a taste and said if everyone ate this cookie, it would cause World Peace.  Wouldn't that be wonderful if a cookie had that power?

World Peace Cookies
(from Dorie Greenspan)
Makes about 36 cookies

1 1/4 cups all-purpose flour
1/3 cup unsweetened cocoa powder
1/2 teaspoon baking soda
1 stick plus 3 tablespoons (11 tablespoons) unsalted butter, cut into chunks, at room temperature
2/3 cup packed light brown sugar
1/4 cup sugar
1/2 teaspoon fleur de sel or 1/4 teaspoon fine sea salt
1 teaspoon pure vanilla extract
5 ounces bittersweet chocolate, chopped into irregular sized bits ( I used semi-sweet mini chocolate chips since that is what I had on hand)


In a large bowl, beat the butter and both sugars together until soft, creamy, about 3 minutes. Beat in the salt and vanilla. Add all the dry ingredients and blend. Add the chocolate pieces and mix to incorporate. 


Turn the dough out onto a work surface and gather it together, kneading it if necessary to bring it together. Divide the dough in half. Shape the dough into logs that are 11/2 inches in diameter. Don’t worry about the length — get the diameter right, and the length will follow. Wrap the logs in plastic wrap and refrigerate them for at least 3 hours.

When you’re ready to bake: Center a rack in the oven and preheat it to 325 degrees F. Line baking sheet with parchment paper or silicone baking mats.


Working with one log at a time and using a long, sharp knife, slice the dough into 1/2-inch-thick rounds. (The rounds might crack as you’re cutting them — don’t be concerned, just squeeze the bits back onto each cookie.) Arrange the rounds on the baking sheets, leaving about 2 inches between them. (If you’ve cut both logs, keep one baking sheet in the fridge while you bake the other.)


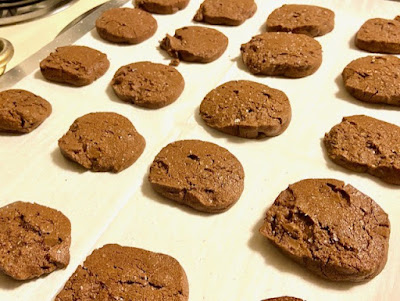
My note:  I sprinkled half of the cookies with flaky salt and I sprinkled the other half with white sugar before baking - I ended up liking the salted ones the best.

Bake the cookies for 12 minutes — don’t open the oven, just let them bake. When the timer rings, they won’t look done, nor will they be firm, and that’s just the way they should be. Transfer the baking sheet to a cooling rack and let the cookies rest until they are only just warm, at which point you can munch them, or let them reach room temperature.

Bake the remaining dough.

NOTE: The dough can be refrigerated for up to 3 days or frozen for up to 2 months. If you’ve frozen the dough, you needn’t defrost it before baking — just bake the cookies 1 minute long.


Friday, February 18, 2022

Tomato Basil Soup - Instant Pot Recipe

 I love Tomato Basil soup and have been thinking of making it for a while. Since I have vowed to use my Instant Pot at least once a month this year, I decided to see if I could find recipe that I thought I would enjoy...luckily I found one on Recipe Teacher.  This one was a bit different than some others saw.  Most use heavy cream but this one uses Greek yogurt so I decided to give it a try.

Now, I SWORE I took a photo of all the ingredients (as I usually do) but it appears the photo didn't actually take - oh well.

I will just jump right in.

First, this called for 1/2 cup chopped onions.  Now I am not a fan of onions but I do like the flavor it gives so often I substitute onion powder in recipes that call for onions.  However, since I knew this would be blended, I decided to add the onions...so I chopped up 1/2 of an onion

I then put the Instant Pot on "Saute" and melted the butter, added the onions and sauteed for about 5 minutes until the onions seemed done and tender.

My house was starting to smell good at this point.  I then turned off the Instant Pot and added the Fire-Roasted tomatoes, broth, sugar, salt and dried basil.


So far, so good...next, I made sure the pressure valve was sealed, closed the lid (I love that little sound it makes when you open/close the lid) and manually set for 10 minutes on high pressure.


When the timer was up, I opened the vent to release the steam, then used an immersion blender to blend the soup so it would be smooth.


 Finally, I added the Greek yogurt and stirred that in with a spoon.


Results: Tomato-Basil Soup (topped with a little cheese)


Thoughts:  This was pretty good but wasn't life-changing or anything.  I would make it again, but would use fresh instead of dried basil and would try it with cream instead of yogurt.  The yogurt didn't really seem to add much to this recipe and the dried basil took away from the smoothness of the soup.  Plus, I just really like fresh basil.

I may seek out a different Tomato Basil soup to try.  I liked this but didn't love it and for a recipe to become part of my regular rotation, I have to kind of love it.

If you try it, let me know what you think.

Instant Pot Tomato Basil Soup

  • 1/2 medium onion, diced
  • 1 stalk celery
  • 2 28.5oz cans of fire roasted diced tomatoes
  • 2 tablespoons sugar
  • 1 tablespoon dried basil
  • 1/4 teaspoon salt
  • 1 cup low-sodium chicken broth
  • 1 tablespoon butter
  • 1/2 cup Greek yogurt
  • 1/8 teaspoon cayenne pepper (optional)
  1. Set your Instant Pot to saute on high setting and melt the butter. When butter is melted and hot, add onions and celery and saute for about 5 minutes.

  2. Press cancel and add tomatoes, broth, sugar, salt and basil. Not the yogurt yet! With the tomatoes, broth, sugar and basil added to the sauteed onions and celery, secure the lid, close the seal and pressure cook for 10 minutes. When cooking cycle is complete do a quick release of the pressure and remove lid.


Wednesday, February 16, 2022

W.I.P. Wednesday - Half Way There


Just like Bon Jovi says....Whoooooa - We're Halfway There.....

Just completed half of the Cross - Stitch I am working on.  For those that are familiar with Pyrex that was manufactured in the 1960s, you may start recognizing what I am stitching.


Saturday, February 12, 2022

Gratitude


Each and every day, no matter what, you can always find something for which to be grateful. If you think about it, you can think of a multitude of things but always, you can find at least one.

One day last week, I went into the office (we are mostly teleworking these days) and I went to the break room to get some "good ice" and water and while there, I looked out the window and saw a bunch of ducks swimming about in the little pond below (14 stories down, hence not a great photo).

I thought...how lucky am I?  That just at that moment when I happened to look out the window, there were all these ducks swimming around.  How wonderful that God gives us ducks.  What a blessing that I am able to see things with my eyes. Even though I don't have 20/20 vision, I CAN see! God created these beautiful ducks and allowed me a few quite moments of solitude during a busy day, to watch them swimming about.


Friday, February 11, 2022

Ball Bands Galore

Yesterday, I talked about yarn and all the various forms it comes in.

When you buy a skein or cake of yarn at most major retailers, they come wrapped with a piece of paper that describes the yarn (the brand, the color, the dye lot #, the fiber type, the weight, etc.).

This piece of paper is called a Ball Band because it is a band that goes around the yarn ball (or skein or cake).

Often, the Ball Band comes with a pattern on the inside.  Now I know there are millions of patterns on the Internet now, but back in the pre-internet days, a good way to get a pattern is by buying some yarn, which gave you patterns to give you some ideas on what to do with it.

Not all yarn come with patterns now, but most of the well-known brands still do and I love that!

Here are all the Ball Bands I had left from when I made the crochet hats for FOTS ministries.


As you can see, there are pictures on it, showing the pattern that is included on the inside of the Ball Band.  I had a couple of duplicates so I threw those away.

I then rolled my left over yarn up into balls and labeled them.  One side of the label has the name of the yarn and the color.  The other side has how much of the yarn I have left (I mark out and change it as needed).  This way, I have a nice way to organize all my leftover/scrap yarn, which can be used for smaller projects.

Then I look through the patterns on the Ball Bands, decide which ones I would like to keep and store them in a Ziploc bag.


I keep all my yarn organized in a large rubber maid container and I add it to my list on Ravelry so I will always know what I have. 


Thursday, February 10, 2022

A Yarn Lesson

When you buy yarn in a chain retail store, it typically comes in a skein.  If you can find the center inside the skein, it is best to pull the yarn from the center instead of the outside.


Why does it matter?  Well, if you pull from the inside, then your skein stays nicely in place while you crochet/knit and flows smoothly onto the hook/needles.  If you pull from the outside, your skein is constantly rolling around and falling on the floor and sometimes the strands get twisted.  

My mom asked me, why isn't your yarn in a ball?  I told her that was more for TV or for different yarn. If you buy your yarn in a hank instead of a skein, you have to roll it into a ball. Hanks are typically found at local yarn shops (LYS) and generally are more natural fiber, such as wool.  (Whereas skeins generally are more synthetic fibers, such as acrylic)

A hank looks like the photo below - in the center is how you purchase it and surrounding that is how the hank looks once you unwrap it.  As you can see, if you didn't roll this up into a ball, it would because a huge tangled mess if you tried to crochet or knit with it.

If you hand-roll a hank of yarn yourself, you will make a ball of yarn.  However, if you use a yarn-winder like the photo below, which is typically what is used at local yarn shops, then you will be left with what is called a cake of yarn, so called because it is more squarish than a ball and more cake-shaped.

Her is a ball of yarn


While this is a yarn cake


If your yarn becomes tangled and a big mess, it is referred to as "yarn barf"


There are so many forms of yarn and it seems every day, they try to come up with something new.  Recently, Red Heart came up with this new form called O'Go - which supposedly helps you from getting yarn barf.  I'm not sure if it does or doesn't - but honestly, this form isn't appealing to me at all...maybe it is because I'm not fond of the current color choices or maybe it is just because I typically don't have that much problem with using center pull skeins.


No matter what you call it - there are many versions and all that matters is that you create something you love with it.


Wednesday, February 9, 2022

W.I.P. Wednesday

I haven't had much time to craft this week but I did get in a little time to work on my cross-stitch project.  It is starting to take shape - almost half-way done.  The is the first time I have made a one color project and let me tell you...it is pretty easy to do.


Wednesday, February 2, 2022

Project Life 2022

 Here are my January 2022 Project Life Pages

I am using the "Project 52 Fresh Edition" this year. 

(Click on image to enlarge) 


Tuesday, February 1, 2022

Rabbit, Rabbit, Rabbit

Rabbit, Rabbit, Rabbit

 Do you say this on the first day of the month?  I read about it a few years ago and I always TRY to remember to say it on the first day of the month.  When I first learned of this tradition, I discussed it with my friend, Amanda, who is originally from the U.K. and she said she does this.  We often text each other on the first with "Rabbit, Rabbit, Rabbit"

"Rabbit Rabbit Rabbit" is a superstition found in Britain and North America wherein a person says or repeats the words "rabbit", "rabbits" and/or "white rabbits" aloud upon waking on the first day of a month, to ensure good luck for the rest of it. It should be the first words you say.

 It is February 1st, and I remembered to say it this morning, so I guess I will have a lucky month.


January went by fairly quickly, at least to me it seemed that way.  So I thought I would do a check in with my goals that I established at the first of the year.

1) Daily Bible Reading/Prayer - Good - I will admit that I am a few days behind in my reading plan.
    However, yesterday, on my off day, I set up a reading plan that will have me caught up-to-date
    by this coming Saturday.

2) Weight Loss/Eat Healthier/Exercise - Good - Weight loss is slow, but I am eating better and have
     incorporated Intermittent Fasting...I did some exercise in January, but not as much as I would
     have liked. So this is an area that needs a bit more attention in the upcoming month.

3) Watercolor - no painting in January and that is okay.

4) Crochet/Knit - Great - I completed 20 crochet hats for the homeless.

5)  Personal Journaling - Great - I am not journaling daily (yet) but I am journaling on a regular basis

6) House Projects - Good - haven't started the 2 big projects that I want but feeling more positive
    about tackling those projects than I have felt in the past.

7) Scrapbooking/Project Life - Excellent - I am current with my Project Life pages for the year
    (I'll post about that tomorrow)
    But the best thing this month was a took a course with Becky Higgins - it was a Documenting
    course that she held live for about 2 hours every day.  It was FULL of information and tips and
    inspiration.  I just love her! I have been a fan of hers since her Creative Keepsakes days.
    I remember when she had her son, Porter.  I met her (and the fabulous Lisa Bearnson) at a
    Scrapbook Convention when Porter was just a baby, and my friend told her how much she
    loved the name "Porter".
    Now, Porter is serving the first year of his LDS Mission. Wow!

8) Genealogy - Good - worked on my Ancestry site about an hour this month.

 I have several books that I use daily.  I think it helps to keep them out and visible at all times.


From Bottom to Top

  • Personal Journal
  • Daily Planner
  • Question A Day
  • Notebook Companion for ...
  • Achieve Anything in Just One Year (daily tasks to help you reach a goal)
  • One Year Bible (daily reading plan to help you read the Bible in 365 days)